What?
I've had to do some derusting on a variety of components recently and it seems to be an expensive and/or hazardous and/or labour intensive business.
The most obvious solution(!) is to choose from a choice of acids such as hydrochloric (muriatic to our Mercan cousins), acetic (vinegar), phosphoric (cola), citric (lemon juice) or perhaps oxalic. To be any good, these would need to be reasonably strong, with the risk of dissolving the test piece if left in too long and also the possibility of some remaining if not fully neutralised.
Or, if not going the strong acid route, there's the use of "chelating" agents. These combine with metal ions and take them out of solution. They are often used to absorb and remove toxic metal salts from (medical) patients or materials without the use of strong acids. There are many to choose from - this interesting patent shows some of the ones in common use.
Put it down to my Scottish blood or my Yorkshire upbringing but I bridle at paying through the nose for rust removers and I don't want to rely on strong acids for rust removal.
As often seems to be the case, when you look more closely at the formulation of some of these US-originated products, they turn out to be pretty mundane. In the case of Evapo-Rust, they make a big song and dance about their special formulation and even claim to have a patent - but when you search for said patent, none is forthcoming. It's all a big mirage and I'd bet in the end they concluded they wouldn't be able to get a patent granted and/or it simply wouldn't be worth the cost and effort.
The US and EU MSDS datasheets are allowed to hide the chemical makeup of the product - they talk of "trade secrets" but funnily enough, the Australian MSDS seems to give the game away. However, as the market leaders, they have good presence and momentum, so clearly the lack of an actual patent shouldn't actually be a major concern to them.
Either way, it shouldn't be a major challenge to come up with a reasonably effective pH neutral rust remover of my own. There are various examples to learn from, such as discussed in the Garage Journal forum, which links to this YT video
and some sodium gluconate which is available at £18/kg inc vat.
If I use 5% of each, that works out at ~£1.10 per litre for EDTA and £0.90 per litre for sodium gluconate ie £2 per litre. Evapo-rust costs £35 for 5 litres ie £7 per litre.
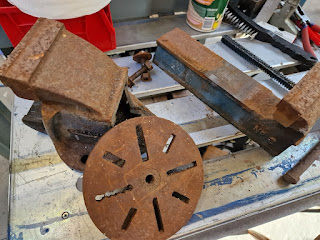
How about this for a test piece?
Let's give it some time and see how that goes down...
Well?
That lot went in at 4:30pm and now it's midday the next day, so coming up to 20 hours. No agitation, just sitting there. Thought I'd take a look, perhaps brush off some of the loose rust and put them back.
But funnily enough, simply brushing it down under the tap with an old paint brush removes ALL of the rust from the faceplate. The vise handle has some way to go still but now there is clear metal visible in places and the handle now moves freely. After brushing any loose oxide clear with the paint brush, it's gone back in. Similarly, the cutters are much better but the white pair are still seized solid. I will check on them this evening (~30 hours) or tomorrow morning (~40h).
And here we are. Simply scrubbing the loose oxide off with a paint brush and washing it off under the tap results in this:
Those remnants of rust in the slots are the result of not reaching in with the brush. This looks pretty encouraging....
What about the other stuff? Well the brass bar cleaned up nicely too, notwithstanding the fact that it's clearly got some sort of varnish / lacquer protection. But yes, this isn't just for rust removal, it removes other forms of tarnishing / oxidisation.
The vise handle didn't look quite so impressive but for really badly rusted parts, you need to help the crud off with something like a pot scrubber or sanding pad. The EvapoRust instructions tell you to do this - it's not some miracle product, despite the marketing bumf. Once this was done, the results are pretty impressive. I've put this back in again and expect it will look even better without much time or effort needed.
The vise jaws were only just immersed (the depth of the fluid was only about 2" or so) but again, when cleaned up with a sanding pad, the results are pretty good:
It's not exactly a precision product, so I doubt I will go overboard and renovate this vise but it has served its purpose.


