Saturday 25 January 2020

PLC for ATC?

WTF? What's with all the acronyms, fatty?
I have had the Fadal ATC (auto tool changer) at the back of my mind for some time now, since I originally bought it. I need to clear the decks of other, ongoing work before embarking on loads of new stuff but nonetheless, so far I don't have a plan for integrating the machine with the Acorn controller. I'd like to have a sensible plan worked out for when the time comes.

The interface options between the Acorn and any peripheral are rather limited. With the Ether1616 expansion board, you get another 16 outputs to use for controlling the ATC but these are (very) low speed, being on the end of a chain involving an Ethernet switch and a set of relays. The latency seems to be of the order of 100ms or so. Perhaps not an issue for an ATC but there's nothing simple like Modbus / RS485 / RS232 etc.

There's a guy on the Centroid forum (mick41zxr - a biker, presumably?) who's attempting something similar. He's spotted an El Cheapo PLC (programmable logic controller) that might be persuaded to be part of the solution and is attempting to use it for controlling his ATC. Very interesting and timely.

Tell me more...
The processing power required to implement traditional PLC functionality is quite trivial compared to what is available in today's microcontrollers. So the component cost for a reasonably functional PLC based on such an approach can be significantly less than the price of a proper industrial PLC. Obviously the software cost isn't going to be trivial though.

The website for the ACE family is a bit clunky looking but it seems to have most things you'd need. It must be said, I've no previous experience of using PLCs mind.

Here's the datasheet for the ACE family

What's inside the box?
And here's a teardown video that gives a pretty good insight into what's inside the box. There's not much there:


Seems that the micro is a Tiva™ TM4C123G microcontroller from TI. Can't pretend I've come across it before but it seems quite well specified:
  • 80MHz 32-bit ARM Cortex-M4-based
  • 256KB Flash, 32KB SRAM, 2KB EEPROM
  • Two Controller Area Network (CAN) modules
  • USB 2.0 Host/Device/OTG + PHY
  • Dual 12-bit 2MSPS ADCs
  • Motion control PWMs
  • 8 UART, 6 I2C, 4 SPI
And it looks to me as if the pricing for low volumes would be of the order of £3-4. This device should be plenty powerful enough for the application.

The outputs are simple ULN2003 Darlington arrays. These are about as simple and dumb as you can get, with no protection of any kind and limited (500mA) sink capability. But you cut your coat according to your cloth I suppose.

The software - vBuilder:
This is where the value lies. Without a decent GUI / IDE, this wouldn't be much use to man nor beast. Here's the web page for the vBuilder installation.

And there are a few (not so many) Pootube videos showing example programs

I found that my Dell XPS15 got into trouble once I'd set up a project and entered editing mode, at which point vBuilder would shrink down into a tiny window with unreadably small text size. As my mother had warned me, years of self abuse took a toll on my eyesight with the result that I can't cope with this. This window behaviour is something to do with the program not being able to handle high resolution displays in Windows 10. The solution is to play with the compatibility settings for the program (RMB on the shortcut, select properties, select "Compatibility" tab, then "Change Hi DPI settings". I think I just checked the second check box).

Next up - try out a few examples in vBuilder...

Thursday 16 January 2020

Bottom side machining

Let's finish this job off:

I did the CAM for this last weekend and having sanity checked it again, it looks pretty good to me. So, set up the toollength offsets for the 2 drills, generate the g code and hit the tit. Let's see what happens - no point prevaricating, just send the fucker.

First, pick up the workpiece origin, as described last time. The Z axis is zeroed on the top of this ground parallel:

The Y axis is set on the face of the front jaws:


and the X axis is picked up on the end face of the work, with a 5mm slip gauge to allow the probe to clear the stock overhang. Then the X measurement is offset by 5.0 + 1.07 = 6.07mm. I now have my machine workpiece origin set at the same place as the CAM has it.

And.....we're off.

Here's the video version:

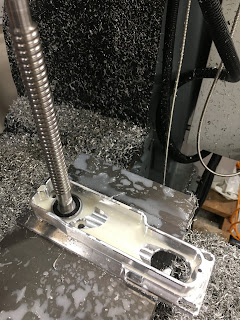
And the still version:


Looking good....


Done. No cockups and no broken tools. 


Messed with the tool diameter offset to open it out a tad. I suspect this is actually due to noncircularity caused by backlash, rather than incorrect tool diameter but the result is the same - the bore ends up needing to be taken out a little. Here it is after a couple of spring passes and some finessing of the tool offset:


Doesn't look too bad. The main offpiss is the excessive chamfering on the topside and the wrong (too large) bore for the servo motor register, as noted last time.


Can't pretend I'm entirely disappointed with the end result. I'll need to think about the cover next.

Sunday 5 January 2020

Finish the Bridgeport Z axis work first, Fat Boy!

WTF??
Whoa, Fat Boy. Before starting yet another escapade in the workshop (the ATC for The Shiz seems to be the latest wheeze), you need to finish what you started, namely the CAD and CAM design of the "final"(?) revision of the Z axis for the Bridgeport CNC conversion. Otherwise the workshop will see yet more jobs that never get finished. The ATC needs to wait!

The current status:

Last time I recreated the Z axis motor bracket / housing using parametric dimensions with the intent to give some flexibility on motor sizes. It was in danger of becoming a bit overwhelming but the end result works reasonably well. I can change the bearing dimensions or the motor flange size and most of the dependent dimensions are automatically updated to suit.

I tried to design the housing from the functional requirement, rather than iterating what I ended up with last time. 


But that was just the housing. To complete the job, I need to update all the other components in the head assembly, such as the bearing model (4201 size now), the modified ballscrew, the new pulleys (now 10t and 18t) - and of course the head casting model itself, which needs to be corrected (spindle to ballscrew centre distance and various minor features). I also need to add the "simple" ballnut yoke.


CAD completed:


CAM created:


Most of the work is done with the long series 10mm carbide end mill, which is a fine beast. I try to use as much axial length as possible, which is how they are supposed to be used. This makes the most of the HSM toolpaths and cuts out a lot of crap, as well as leaving a superior finish with little or no visible stepdowns. As long as you don't get carried away with the optimal load (radial depth of cut), there isn't any chatter. And taking a finishing spring cut ensures there is little if any unauthorised material left at the end.


I blasted a 10mm drill through the stock at both locations where the end mill is expected to spiral down into the stock to create the cavities for the motor and ballscrew bearing. This not only helps the end mill to spiral down into the stock but also allows the coolant and swarf to drain away. Recutting swarf seems to be the biggest risk to the life of cutters, especially when achieving half decent MMRs.


Stock cut up:


Tools prepped:
Here they are, all set up and ready for action:


Metal cut:
This went pretty well although I caught it trying to do as it was told, which was to try to mill the 6mm slots using a 7mm drill. That wouldn't have ended well for either the drill or the workpiece. The giveaway was when the spindle sped up to 6000rpm with the drill still in place, when I had planned it to change to a 4mm carbide end mill. As the ramp feed rate was fairly modest, being a small end mill, I had enough time to shove The Stupid Fat Bloke out of the way, figure out what was going on and stop the program. That bloke needs a smart cuff over the back of the head, or possibly a horse whipping.


WTF happened?
Turns out I'd called both the 7mm drill and the 4mm end mill Tool 5 in Fusion 360, when the end mill had been set up in the machine as Tool 14. Obviously the machine didn't see any need to stop the spindle and ask me to change from Tool 5 to Tool 5, so it just carried on. Machines do as they are told!

I created a separate program for the last 2 operations, namely the slots and the final chamfering.


Final result - top operations?


Came out well:


The chamfering was a bit heavy. Turned out The Stupid Fat Bloke had set the chamfer size to 1mm - I told him to set it at 0.5mm. Also he set the motor register diameter at 50mm, not the approved 38mm. I've fixed that in the model and given him another fat lip.

Bottom side CAM - Setting up:
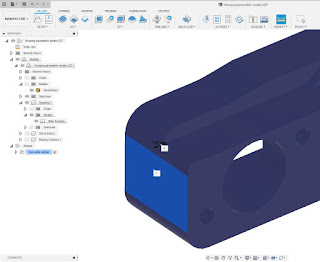
Next will be the bottom side operations. The tricky question is usually how to pick up the "same" part origin once you have flipped the part over. This point is the best I can think of, as I don't have any precise feature that passes through the whole body. The through holes were drilled using a std (stubby) twist drill, so not very precise.


I can pick up the Y and Z coords from the top face and the X from the highlighted face below. However, the part origin isn't on the face - it's offset from the origin. I will probe that face and then tell the machine its actual position, which is not zero on the X axis (it's X-1.07mm).


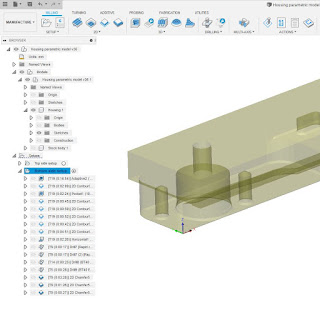
Having machined everything I can manage from the "top side", I like to export the remaining stock (after the top ops) as a body, then use it as the stock for the remaining operations. Here's how to create a body from the last completed operation. It works well but you need to know how to do it! 


Toolpaths:
Here's the setup for the next ops, with the stock model carried through from the top side operations:


Almost all the work will be done by the 10mm long end mill. Then a couple of drills for the fixings (M4 and M5), then finally some chamfering.


Should result in this:


Machine setup:
The precision(?) ground parallels should help here. I can pick up the X from the machined face on the left (offset by 1.07mm), the Y from the rear face of the parallel that's poking out from the vise in the next photo and the Z can be set from the top face of the same parallel. 

In fact, I've changed the stock origin to the point shown here, as it's going to be easier to pick up than the one I chose previously:

Here we are in the vise:


It's set up now, ready for action. Sounds simple - what could possibly go wrong?

Right, that's it until next weekend. Hopefully I will be able to machine this up on Friday evening. Looking reasonable so far....

Final assembly and test of the spindle nose adaptor - RESULT!!

After the recent distraction caused by the 3D scanner, resurrecting the 3D printer and buggering about with the throttle bodies for my Honda...