Sunday 30 June 2019

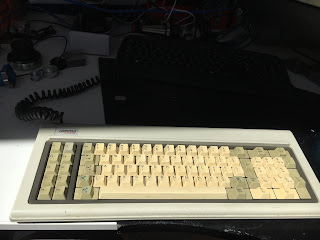
Compaq Portable keyboard "Retrobrighting" and repairs - it lives and talks again!


Explained in Wikipedia(?)

Disassembly and cleaning / retrobrighting:


Tool for removing the keys, made from shim steel:


All off:


The keys are both grubby and browned off: 


I cleaned these with washing up liquid, then let them sit in 12% hydrogen peroxide with a spoonful of "oxy" washing powder. They were in broad daylight (and heat) on the 2 hottest days of the year here so far. 

Foam and foil replacement:
Now, I have to remove all of the perished "foam and foil" pads: 


Quite a PITA to remove the little disks at the bottom of the opening. I used a scalpel:


A week later, the replacement "foil and foam" pads arrived from the US. Although they only cost $25, I'm paying 2/3 that again in VAT, by the time the UK postal service has helped itself to £8 in "handling fee". At that price. the handling should include a "happy ending". Fuck 'em.


It was a royal PITA getting them seated properly. There are 4 little fingers that you must get the lower disk to click past. I used a scalpel again. 


Quick clean of the PCBA pads with IPA. The pads appear to be electro tinned at best. Not silver (probably a good thing) or nickel.


Almost back together:


Done. Looks a lot better now but not artificially so.


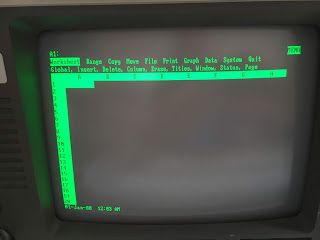
Rebooting with the repaired keyboard:
Yes, I simply reassembled everything and powered it up. It's all very well trying stuff out step by step but in this case, it was simply a matter of the pads being fucked and, as I was pretty certain I'd done a good job of the replacement process, it was bound to work surely?

But does it work? Yes, every key produces what it should on the screen. Phew!


On the Western Digital Filecard 30 (30MB hard disk - whoooaaarrr!), I can see a few familiar programs, such as Norton Utilities:


Lotus 123:


Norton Commander: 


And there's also WordPerfect 5 for what it's worth. Here's what Norton's System Information tells us. I have the full 640k of RAM(!!!!) and am running DOS 3.31


Although the internal Filecard HDD appears to have DOS 5 on it, the machine won't boot from it. I don't recall its history but it appears to have ended up in an Elonex 386 (possibly 486) machine after its initial duties in the original Compaq Portable, judging by the QEMM386 Memory manager entries in the config.sys file. 

Next - try to make the Filecard bootable (command.com, FDISK etc). It's all a bit hazy after all these years but it will come back. I still have the original Norton's DOS guide and Norton Utilities books from back in the 80s / 90s.

I've got some useful support from the retro PC forums

Sunday 23 June 2019

Finishing operations - Z axis bracket

Counterboring the fixing hole:
Not much point bothering to create a toolpath for this. The hole needs to be bored out 12.5mm to clear the bolt head, so I'll use a handy 1/2" 4 flute end mill. The shoulder is 44mm below the top surface.

I set the origin in the middle of the top of the 10mm hole, then double checked that the bottom hole was at the same X,Y position. The Renishaw probe only just manages it. The reported hole centre was claimed to be within 10um, which is fine by my standards.


Done. The bolt sits just flush within the counterbore:


And I drilled the 3 fixings using Fusion 360 CAM.


Manually tapped the three M6 holes:


And made up three matching bolts to suit the ballnut dimensions:


The slight issue-let is that the holes in the ballscrew are claimed to be 5.5mm diameter ie for M5 clearance. Of course, Fat Boy has committed to using M6 fixings and the holes in the ballnut certainly aren't M6 clearance. The screws I have made up (22mm long) are almost but not quite able to go through. 

Lesson: change to M5 threaded holes (4.3mm tapping?) next time (if there is a next time) and somehow open the 3 ballnut holes out sufficient to get the M6 fixings through on this example. I would use a carbide burr if I had one - or possibly use a carbide end mill. I'll check to see if I have a 1/4" end mill which would be ideal, having a degree of additional clearance over an M6 fixing, then use The Shiz to place them and control the feed carefully.

Saturday 22 June 2019

Roughing out the stock for the Z axis yoke - and CAM

Roughing the stock:
Having put the Korloy face mill away while I await new inserts, the best means of facing off the stock for the new yoke is using the side of a long series end mill. I can't abide the finish you get using the end face of an end mill and of course it wears out the corners of the flutes like no business. The stock is 30mm high, so a std length cutter won't work.

This is a YG-1 ESH516 "super hardened HSS" cutter and sure enough, it cuts the finest swarf. This thing only costs a tenner and although it may not be able to shift swarf as quickly as carbide, it's pretty good. I have a few of the YG-1 EMC85 extended, necked carbide cutters but using them in manual mode to rough out stock seems a bit daft, not least as they cost about £50 each.


Using a 10mm cutter, 1100rpm, 1mm stepover, full depth (30mm) hardly seems to be pushing things. However, with 3xD cut (I'm impatient), it's prone to chatter of course.


Nice sharp swarf and reasonable finish:


Coolant seems sensible for a HSS cutter:


There - stock faced off on all sides:


Ready to do the CNC bit now....


CAM for new yoke:

Took a bit of buggerage trying to find a toolpath to create the filleted channels. They might seem a bit odd or possibly even unnecessary but ironically the reason for putting them there is to make the part machinable. Que? Well, the central stub is a cylindrical section that plugs into a mating radial bore on the side of the quill. And the lands at either side have the same radius as the outer cylindrical surface of said quill. It's pretty tricky creating those 2 cylindrical features at 90 degrees to each other but they are what I feel gives this concept 
its strength, literally. So running a ball ended end mill in there does the trick. And by leaving a nice 1.6mm fillet, I hope to avoid any unnecessary stress concentrations.

The problem is that I have modelled a 1.6mm fillet and aim to machine the fillet with a....1.6mm radius tool. That just doesn't seem to compute with Fusion 360, even with all the "stock to leave" etc options unticked. I even went into the model and increased the fillet to give it something to work against.


The solution was a bit of a fiddle. I went into the model and deleted all the fillets around these features. Then called up a 1/8" ball end mill and programmed the CAM as if it were a square ended cutter. The end result is what I originally modelled. 


Here's the stock model (a simple cuboid). I chose to put the origin where the bolt axis meets the stock surface. The stock surface is now the model surface and the position in X and Y is possibly going to be more accurate if placed midway between the vertical faces than if I use a corner of the stock.


The stock model coincides with the CAD model quite convincingly.


Making swarf:

Here's the ball end mill roughing out the fillet slots either side of the fixing boss.


That went well.


Finally, I drilled the fixing hole manually (with the MPG), as the Z axis movement wasn't enough to accommodate the long drills. 


Happy with that. And it's a nice snug fit in the quill. The whole thing took about 15 minutes to machine.


What's next?
To finish this off, I need to counterbore the fixing hole and drill / tap the three M6 fixings that hold the ballnut into the yoke. Then I'm done.

Thursday 20 June 2019

Compaq Portable lives and breathes - but with some issues

Years ago I acquired an original Compaq Portable PC. Looks like a sewing machine - and weighs about as much. These are often referred to as "luggable" rather than "portable".

I upgraded mine to the full 640k RAM (!!!!) and inserted a 30MB (!!) Western Digital Filecard (aka Hardcard). I was able to run Norton Commander, Norton Utilities, Sidekick and World Golf. At one point my dad acquired a dial up modem from an auction - IIRC, this was a Hayes 1200 baud(!!) Smartmodem. There wasn't much out there in those days but I recall connecting to Dr Soloman's BBS. Finally, I splashed out on a Naksha serial mouse. Along with Norton Commander, I had an almost-GUI experience!

Rightly or wrongly, about 25 years ago, I scrapped the thing, along with an original IBM AT, as they were both pretty much obsolete. But I kept the Hardcard and a load of the 5.25" floppies.

About 5 years ago, I found a very similar machine on ebay. Didn't cost much, although I forget how much. Apart from the fact that it's a 120V machine (I bought it when I lived in Canada, from a guy in the US), it seems a good 'un. 

Here's what it looks like:


Looks innocuous enough:


But that bottom panel is actually a keyboard and it also reveals the screen (green monochrome) and twin 5.25" floppy drives.


The side panels simply clip on and off, revealing a sheet loominum chassis:


This is actually a memory expansion board:


I believe it has the largest RAM chips available (4164). Note the datecodes which suggest this card was made in 1985-86.


The hardcard seems to have a datecode of 1988.


I have a US style IEC lead, to help me to remember to plug into the 120V supply. If I plug into 240V, the PSU will pop.


Woohooo. Here are the initial BIOS messages:


And the DIR command shows the files and folders on the A: system floppy:


The filecard is mapped as C:


But......I can't type an "N", so it's not possible to run Norton Commander, or even to change to the NORTON directory. There's a simple reason for that....


Looks as if the last time I used this was in December 1993.

Under the other ("bottom") side cover, there's a cover plate (top RHS):


The keyboard cable comes up a loominum tube and plugs into the motherboard in a shielded connector (top of pic). A simple Tyrap cable tie formed a cable anchor.


There - keyboard removed:


Cover off:


PCBA removed from housing. Date codes suggest late 1985, most likely 1986


Underside:


It's a capacitive system. Those little pads cause a capacitive shunt across the PCB contacts.


But the metalised plastic film is losing its metalisation:


This one is actually the "N" key. I know that one doesn't work and indeed there is almost no metalisation left at all.


There's a layer of foam rubber(?) which has rotted away, into a sticky fluff.


This is what a slightly better one looks like:


The top and bottom disks are about 11mm diameter. The other disk snaps into place and seems to be stiff plastic film, something like Mylar


Good time to record the key positions, as I'm going to have to pull them all off  for cleaning and to replace the pads.


Luckily, someone's been here before:

8-Bit Guy's Compaq Portable resurrection video 1

8-Bit Guy's Compaq Portable resurrection video 2:

The 8-Bit Guy had all the problems, from floppy, graphics board, keyboard etc. My machine just works, even after 25 years.

But what I've learned from these videos is that it's possible to obtain  replacement pads from TexElec, so there won't be any need to piss about with films and glue. So I've ordered a set of those.

He also mentions products such as a 1MB RAM board and upgrades such as CF (flash) board that will sit on an ISA bus. I guess this will provide similar functionality to the 30MB Hardcard, so I ordered one of those. However, the original UK developer Lo-Tech products (James Pearce) seems to have handed off sales of the products to a US outlet. And worse than that, they have nil stock. So instead I got a similar retro product from AA Pro Ltd. This claims to have a boot ROM and an IDE interface, allowing you to boot from an IDE-connected storage device. Who knows, that may be useful.

There's a useful forum for retro-minded PC nerds - 8-Bit Guy forum for retro computer stuff. Bizarrely, its address is murray2.com but I can get over that.

Finally, I ordered some 12% hydrogen peroxide, so I can get rid of the discolouration of the (originally) white plastic. The discolouration is caused by bromine in the plastic and can be reversed using peroxide, as explained in the second video. Seems you can't simply buy 12% peroxide in a pharmacy these days due to terror concerns, although you'd be hard pushed to make an explosive device using 12% peroxide.

For now, I await the peroxide and the keyboard pads....

Final assembly and test of the spindle nose adaptor - RESULT!!

After the recent distraction caused by the 3D scanner, resurrecting the 3D printer and buggering about with the throttle bodies for my Honda...