Sunday 16 April 2023

Hardening the Camlock cams

I need to harden the Camlock cams before I can consider this part of the job complete. There are 2 stages to this.

The first part involves heating up to >800C or so, then dunking in a bucket of water. A bright red heat would work here, although my propane torch is only just about up to the job. MAPP gas might have done better but it's no longer available.


They've oxidised a bit, not surprisingly, but hopefully I can pickle them clean again later. They should now be as hard as witches' tits but we don't actually want that here. The Chinesium Loeb hardness tester reckons about 47 HRC. These aren't 100% convincing devices but the result isn't completely silly.


The next stage is tempering them to a less extreme hardness, giving a less brittle result. Probably not critical but it's not a problem to do a slightly better job of it.

https://en.wikipedia.org/wiki/Tempering_%28metallurgy%29


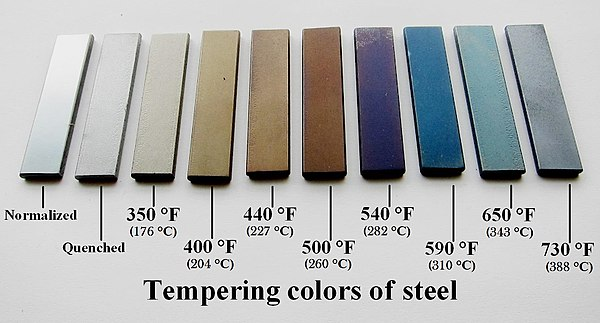
  • Faint-yellow – 176 °C (349 °F) – gravers, razors, scrapers
  • Light-straw – 205 °C (401 °F) – rock drills, reamers, metal-cutting saws
  • Dark-straw – 226 °C (439 °F) – scribers, planer blades
  • Brown – 260 °C (500 °F) – taps, dies, drill bits, hammers, cold chisels
  • Purple – 282 °C (540 °F) – surgical tools, punches, stone carving tools
  • Dark blue – 310 °C (590 °F) – screwdrivers, wrenches
  • Light blue – 337 °C (639 °F) – springs, wood-cutting saws
  • Grey-blue – 371 °C (700 °F) and higher – structural steel

The Samung fan oven claims to be able to get up to 250C, which would place the resulting temper somewhere in the hammer, chisel, tap, scriber and chisel blade territory. I guess that might work. My "Aldi Special" IR thermometer claims to work up to 380C, so it might give me an idea if the parts get anywhere near the claimed 250C.

So I'll bake them in the oven for a few hours once we've finished with it for the day - then dunk them in water again before pickling again. That will have to wait until next time....

Sunday 9 April 2023

Fuel pump adaptor - CAD and CAM - and swarf

The Stupid Fat Bloke allowed me to be talked into machining up an adaptor for him. Apparently it allows a different fuel pump to be fitted to a Land Rover diesel engine. No, nor me. 

First, draw up a CAD model from the sketch provided. Some mods made, to avoid tool changes (change fillet to chamfer) and a larger drill (I actually drilled 3mm through in the end).


Then some toolpaths. Roughing, followed by a finish.

Here's some 3/4" (~19mm) mystery stainless. Possibly 303, 304 or 316, who knows.


Get it set up in the tedious 4-jaw:


It's actually the centre drilled hole that matters in terms of concentricity, so have another go, Fatty.


And off we go, finally:


Didn't come out too badly:


Done:


Part it off:


Over to the Bantam for drilling, as I don't yet have a turret mounted drill chuck for the Tree.


Finished. No great amount of deburring attempted, as I ran out of time at this point.


I didn't actually check any dimensions after running the program but at least the 5mm diameter was close to spec. The 6mm, 9mm and 15mm diameters were slightly under by about 120um but hopefully they aren't critical.

Also it wasn't possible to achieve the radius on the nose, due to the need for tailstock support at the thin end.

Final assembly and test of the spindle nose adaptor - RESULT!!

After the recent distraction caused by the 3D scanner, resurrecting the 3D printer and buggering about with the throttle bodies for my Honda...