Thursday 25 April 2019

Newker 990MDCa controller - tool length compensation

I've done my best to understand the section of the Chinglish manual that deal with automatic tool length compensation, Z axis position etc. However, I'm going to have to do some experimentation before I can claim to understand how it works and thus clarify that section of my own (English!) manual.

Connecting it up:
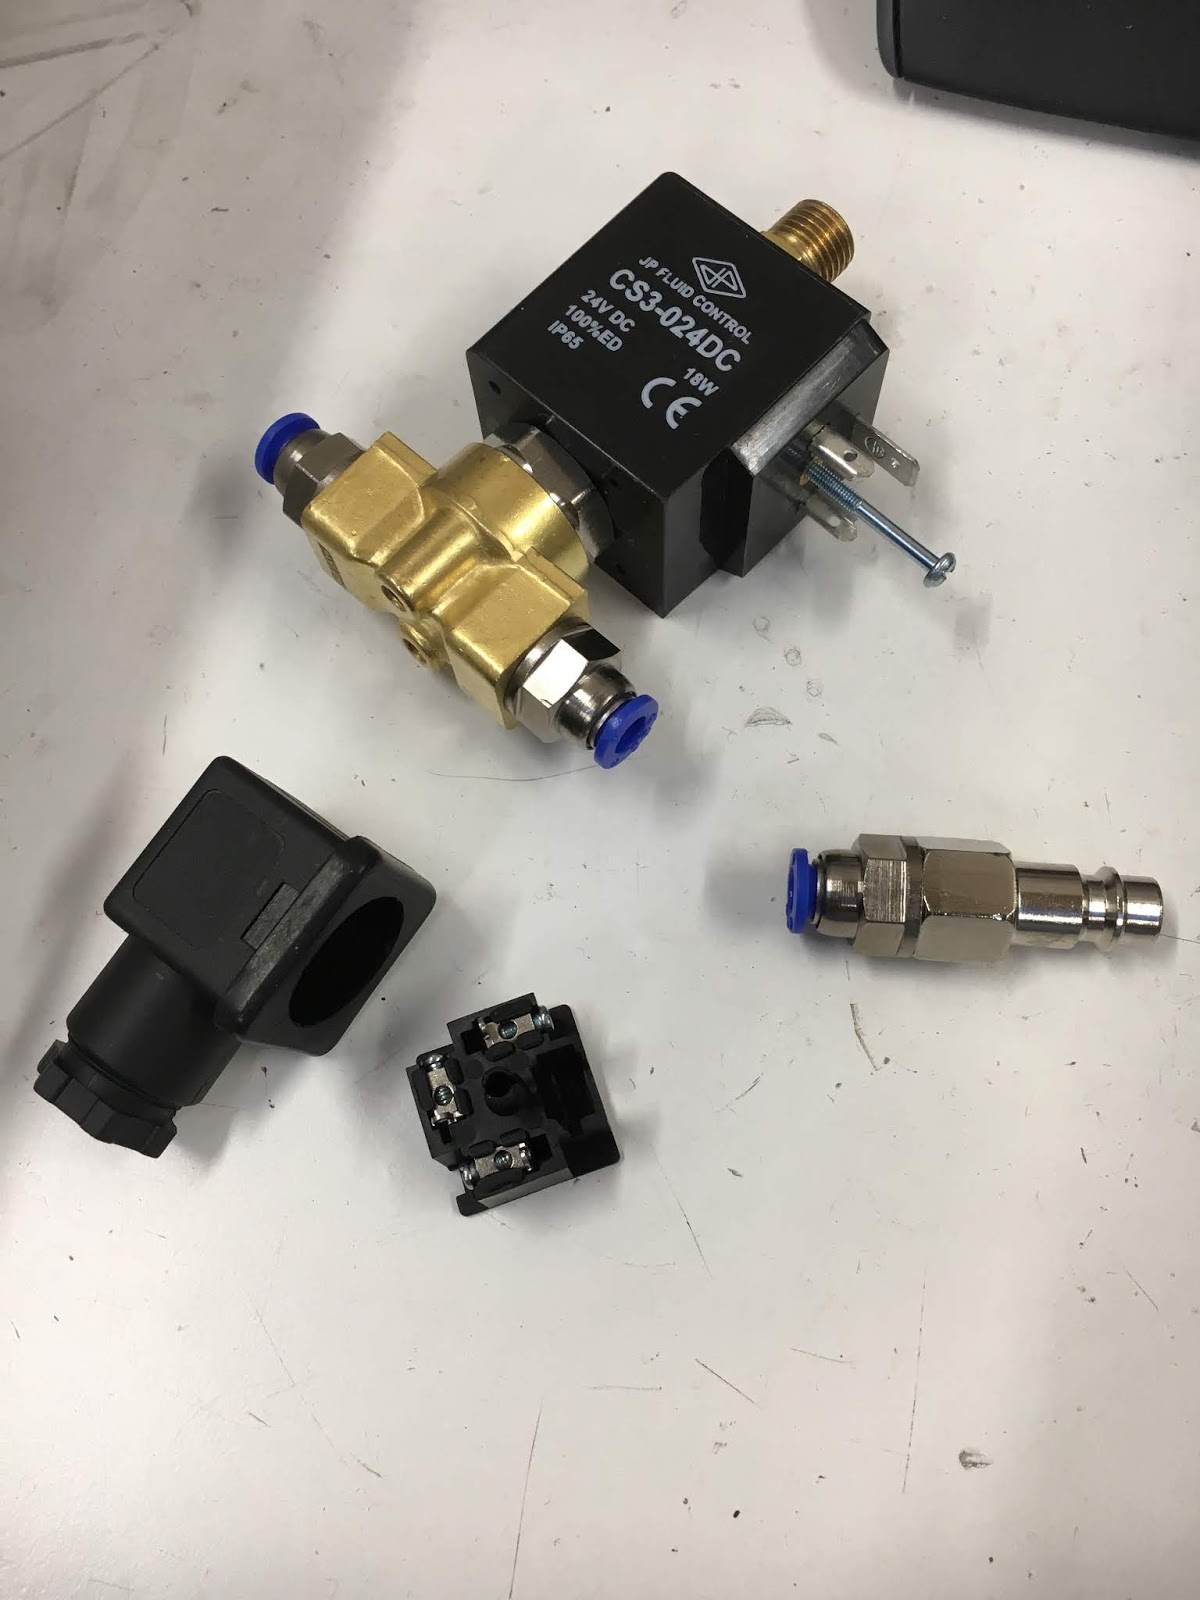
Firstly, I need to get some sort of tool setter / touch pad thing working. Some time ago I made a simple but crude conductive pad for this purpose. Like most examples it relies on pulling down a normally open input on the controller by contact between the tool in the spindle and the touch pad. Obviously this requires the tool to be grounded - and the system 0V connection to be connected to the machine metalwork.

This is what I ended up with on The Shiz (with Centroid controller) before I bought a slightly more workmanlike device. It's got a 3.5mm jack on it, as it needed a "probe detect" signal as well as a "tool touching" output, to prevent you seeking a tool without the probe connected. For the Newker controller there doesn't seem to be a probe detect function. 


I may get around to wiring in a fixed tool setter at some point but for now all I need is a single wire, so a 4mm banana plug and socket will suffice. The conductive centre contact from a 4mm plug does the trick, holding the spring and plunger in place as well as making the required contact and providing a 4mm socket for a flying lead.


4mm socket on front panel, 4k7 pullup to 24V and a wire to the X25 / M28 input is all that is required (yellow wire):


Making it work:

That was the easy part. Now for some trial and error:

  • Run macro M882 from MDI. This stops the tool at the surface of the touch pad and stores the machine Z coordinate somewhere (not sure where).
  • Then manually jog the tool down to the surface of the table ie level with the bottom of the touch pad. This could go horribly wrong!
  • Then run macro M883. This stores the difference between the last 2 Z coordinates in Other Parameter #389. This value is simply the height of the tool setter, which is about 42mm in my case.
  • NB: #389 only needs to be acquired once.

The tool setting parameters (in Other Parameter):

  • #380 - the X machine coordinate of the tool setting position
  • #381 - the Y machine coordinate of the tool setting position
  • #382 - the Z machine coordinate of the tool setting position
  • #383 - the downward speed of the tool as it seeks the touch pad (mm/min). This can be reasonably fast eg 500 mm/min or so.
  • #384 - the (slow!) withdrawing speed of the tool seeking movement after the tool has touched the pad (mm/min) eg 10 mm/min. The tool will stop once the contact is broken again. This speed determines the accuracy of the measurement to some extent - the next step is to save the current position to the tool table.
  • #385 - it's claimed to be the Z machine coordinate of the tool setting position but I can't discern any effect. It doesn't seem to change anything.
  • #386 - the rapid speed to the location of the tool setter, including the Z retract to the safe height specified in #383 eg 1000 mm/min.
  • #387 - automatic / manual setting mode. 1 means use the fixed position defined by #380-382, 0 means manually position the tool above the setter, which can be simply placed on the workpiece.
  • #388 - The minimum Z axis machine coordinate ie how far the tool is permitted to descent while seeking the tool setter. Could be as much as the soft movement limits eg 90mm.
  • #389 - described as the "gap", this is the height of the tool setter which can be acquired automatically using macros M882 and M883 as described above. It only needs to be done once.
Populating the tool length table (press the "Redeem" button):
  • Ensure the tool setter is plugged in (and positioned at the defined X & Y coordinate position on the table position defined with #380 and #381 if you are using a fixed tool setter position).
  • Insert the tool.
  • Run M882 in the MDI screen. Unless you have screwed up the settings, when you press the green go button the tool should retract to the Z coordinate defined in #382, then it should move to the X & Y coordinates defined in #380 and #381 at the speed defined by #386. It should then (rapidly) descend at the rate defined in #383. It should stop once it touches the touch pad, then retract (slowly) at the rate defined by #384. Once the tool loses contact, it should stop and the helpful Chinese message should tell you the process was successfully completed.
  • To save the tool length offset to the tool table, press the "Redeem" button to bring up the tool length offsets table. Move the highlighted row to the current tool using the up and down arrows, then press "A - SetTool" to save the current Z machine coordinate to that tool number.
  • Insert the next tool and repeat...
Testing out the tool length offsets:

If I've done this correctly, I should be able to swap between 2 tools from the tool table and position them at the same G54 height. 

Something like this:


                G49     
                G53 G00 Z0
                G54
                G43 H02 Z15. 
                G04 P1000
                G43 H01 Z15.
                G04 P1000
                G43 H02 Z15.
                G53 Z0
                G49
                G53 Z0
                M30
  • The initial G49 clears any current tool length offsets. 
  • The G04 P1000 causes a 1000ms delay in the program between virtual tool changes.
  • You need to issue G43 H02 etc to apply the length offset for tool 2 etc. Simply declaring something like T02H02 won't do anything until you issue the G43 to make it active.
  • You'd need to issue a M06 tool change if you wanted to physically swap the tools out but for now, I'm simply looking for the quill to move between tool changes, by a distance equal to the difference between their length offsets.
That worked nicely.

Here's the machine doing the business on a dummy tool:


Whew

Zombie servo drive - DMM Tech servo drive settings

Hmmm. Left the machine powered up (with the e-stop depressed for safety) and came back to find the X axis unresponsive. The drive was still functional (leadscrew held firmly in position) and the controller was trying to drive it but nothing doing.

Connected up the comms software and it seemed to have defaulted to RS232 rather than the step/dir scheme it had been running. How the f*ck can it change that?? The comms lead wasn't even connect up.

Changed it back and all is good again. But when can I expect this to happen again?

For the record, here's the settings screen for both X and Y axes:
Not unduly impressed by this.....

Wednesday 24 April 2019

First cut on the Bridgeport CNC conversion!!

Just do it:
Let's not fuck about here. It's taken me a couple of weeks to design and make a pneumatic actuator just to enable me to change the tool, what with Easter break and other house works (the Domestic Manager was also present). The least I can do is get on with cutting some swarf now that I've fixed that.

Before I realised that I had no means of changing the tool, I'd fitted a piece of engraving (laminated) plastic to the table. That still seems like a reasonable starting place, so let's make a simple CAM file to try out engraving.

CAD and CAM: Using the text tool in the sketch environment, then extruding it 0.5mm down into the stock should do the trick here. Never done engraving before and I've not bothered to see how thick the layers are - I am assuming 0.5mm will do the trick.


I'm using a 2mm carbide PCB milling cutter because I have a (small) box full of them, mostly in a usable condition. That should make a reasonable job of the corners without taking forever to complete the job. 

Using a 2D adaptive toolpath won't give a perfect profile but I'm just looking for proof of function initially. 


Post this, using the custom Newker post processor I made a couple of months back. Then try to remember how to set machine and work coordinates - and tool lengths. Then finally hit the green tit. And....nothing happened. Needed to remember to press and hold the button on the MPG pendant. Doh.

Pleasing action resulted:

The cutter survived and the end result is OK once I'd lowered the tool another 0.25mm. Seems the stock wasn't very flat and / or the thickness was greater than I'd expected. 


Unlucky for some but it's also our house number. Happy with that. And so is Rufus, although he seems to have gravitated towards the bigger machine. Good boy.


A couple of things:

  • The VFD took forever to ramp down. Needs the parameter sharpening up somewhat. No point forking out for a proper braking resistor if you aren't prepared to actually use it.
  • The ramp feed rate is miles too slow. That needs looking at.
  • The retract and top heights are too high, particularly with the current feed rates. I have a life to live.
  • I need to calibrate / configure the VFD. Currently I haven't much of a clue how fast it is spinning.
  • I just pulled the speeds and feeds for the cutter and laminate out of my ass. I should really work out a sensible set of values for next time.
  • I need to dig out the manual and set up the tool length offset table. Ideally I'd fit a touch off pad thing to do it automatically. I had to set the tool length offset to zero to get it to work, as the previous values (from The Shiz) resulted in illegal Z values when it loaded the values for Tool 2 called up by the program. A bit of MDI to set G54 and some messing with the values in the tool table ("redeem") did the trick.

Pneumatic drawbar - final assembly and testing - success!

The last pieces:

Although we can't get McMaster Carr stuff in the UK (nor could we in Canada when I lived there), it's less hit and miss than the likes of Traceparts, as all the parts are available in a consistent, common interface and the range of parts is quite amazing. Traceparts has a larger inventory but they are all hosted by different manufacturers, so there is little consistency. It can be pretty frustrating to use that system to try to find simple parts such as fasteners, so MMC is the way.

There's a simple interface within Fusion 360 for opening the MMC online catalog and bringing CAD models into your design under the Insert menu. This way I was able to insert the 8 fasteners and the hose coupling to complete the assembly. I also changed the thread on the push rod to a modelled one just for appearances.


Making the pillars:
So the last items to make are the pillars that hold them end plate together. These are made from some mystery alloy rod of about 16mm diameter, 34mm long, with reduced (10mm dia) ends to locate in the end plates. Tapped M8 at each end.


They seem to fit


Reasonably accurate, given the context: 


I done got me some o-ring material some years back. It's what I designed the groove dimensions for but needs to be cut to length and superglued together.


Looks OK


All assembled, just requiring the bottom plate:


There:


This is where it will go. The existing arrangement relied on backing the quill up against this adjustable stop, which forced the drawbar down against the yellow die spring, releasing the pullstud. 


Here are the solenoid parts. 


I've wired a flywheel diode into the back of the solenoid plug:


Buggeration and f*ck. Got it all wired up and doing a test with a bench PSU. With 4 bar supply pressure, it still leaks enough air past the solenoid to almost move the piston. WTF??? 

Taking the piston out shows the issue - the rubbery seal thing has a crack on its surface. It doesn't look central enough to be an issue but the piston is a pretty loose fit and presumably allows enough radial movement for the crack to coincide with the seat. The annular indentation is almost certainly a moulded feature, as the return spring is very weak. 

Spoke to Tameson customer services, who have sent a replacement piston. I can still get the drawbar mechanism installed and commissioned regardless, as the thing still works and the piston can be changed easily without disturbing the rest of the installation.


Here it is, perched on top of the machine. Not the most professional work I've done but it performs the required function and seems to validate my design calculations. There's a career as a machine designer in me yet..... 


Good stuff. With the SSR relay wired up to the M10 (chuck) output, I can toggle the drawbar up and down from the front panel. Sorted! No detectable leakage when the piston is actuated.

Perhaps now I can look forward to cutting my first swarf on the new addition to my CNC workshop.

Friday 19 April 2019

Pneumatic actuator - making the end plates

Final assembly:
Quick tidy up of the assembly before looking at making the end plates. For one thing I need some groove to accommodate the spring which is 14mm long when solid. Also, I don't need an o-ring on the rod end of the cylinder, so there's no point making life difficult and risking tool breakages by machining an o-ring groove there.

I've even added the air inlet which is 1/8" BSPP.

Let's do some CAM now:

Bottom plate


 Top plate


....and make some swarf:


After drilling the 5 holes in the bottom plate, I had to do some "other stuff" which required powering down. So I had to pick up the coordinates again. 

With this probing operation you need to have confidence that your machine isn't going to go doolally and rip the tip off the probe....


Let's go. 4mm carbide end mill at 5000rpm.


Looks reasonable but there's something not quite right here. For one thing, the cylinder doesn't fit.


The Stupid Fat bloke had left 0.5mm stock to clear which left the diameter 1mm undersize. Told him to take a hike, reran the part, then moved on to the top plate.


I haven't got any experience with rigid tapping and for the sake of one hole, I just limbed it with a tension / compression head.


There. Looks reasonable. 


This leaves the spacers (ties to hold the plates around the cylinder), the M12 threaded push rod and the cylinder o-ring, plus the actual niceties of mounting it on the machine.

Tuesday 16 April 2019

Pneumatic actuator concept finalised - and machining components

Final concept:

I was trying to keep the concept simple to avoid messy machining and structurally weak parts. This was complicated by the fact that the spring is about 48mm OD and the seal is 50mm ID. 


The solution was pretty obvious although I'd left it in the hands of The Stupid Fat Bloke, which is always a mistake. With him kicked aside, I could see that the seal retaining ring can also act as the spring guide. That made matters fairly straightforward, so I was finally able to get things moving on the machining front.


Here's what the piston assembly looks like. Results in a simple piston, a simple seal retainer and I can use my existing spring. The piston nose bottoms out on the end plate of the cylinder housing, preventing the spring being squashed or the cap head screws digging into the housing.


Components arrived:
All the shit I'd ordered turned up during the week. Here's the seal, sitting in the cylinder. It's possibly a bit small on the OD but should work. The technical drawing(?) was very basic....


The solenoid valve and various BSPP fittings:


Looks like this when you assemble the various parts:


BSPP taps - 1/8" and 1/4" sizes, for the air hose fittings:


I also found the bag the original die spring came in. Seems it's actually 520lb/in, so I may need to reduce the preload....


 Machining the piston and retainer ring:


M12 tapping: 


Reduce the nose to the right length: 


Turn it around and face off the piston face:


Machine the step with a parting tool:


Chamfer: 


Done:


Piston retainer will need to be made from steel as I have nothing suitable in loominum. But this hollow (mystery metal) bar stock is a handy starter:


Parting off under power feed:


Done:


Looking good:


Next - drill and tap the ring and piston (and seal) for the four M5  retaining bolts to complete the piston assembly, then move on to the housing end plates...


Quickest to simply use the MPG to "manually" operate The Shiz for this. 

First, the retainer ring. A v-block and parallels to hold it in position:


The 41.44mm dimension works best - results in +/- 20.72mm for X and Y coordinates:


Then the piston:


I used the probe to find the centre of both parts, then MDI to set the X and Y positions of the holes:


Now for some holes in the seal. This is better for making disks than for making holes:


This works better for small holes:


Done:


Piston assembly completed:


Still fits the cylinder!


Next - focus on the end plates...

Final assembly and test of the spindle nose adaptor - RESULT!!

After the recent distraction caused by the 3D scanner, resurrecting the 3D printer and buggering about with the throttle bodies for my Honda...