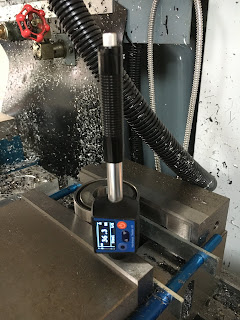
I bought one of these portable Leeb hardness testers from AliExpress. Arrived fairly promptly but of course TNT decided to help themselves to my funds on the way into the UK.
I've had a chance to look at it now. The carry case it comes in is a Chinesium copy of one of those “Pelican” travel cases, although I suspect the water / dust proofing qualities may have been lost along the way. Nonetheless, the stuff inside seems to be reasonable.
Yes, the Leeb hardness scale is actually very simple. It’s just the ratio of the impact and rebound velocities, from which some clever dick materials guys (Leeb and Brandestini) deduced a relationship to hardness.
As for the method of acquiring the data, “a magnetic impact body permits the velocity to be deduced from the voltage induced by the body as it moves through the measuring coil.” Sounds simple enough – and what you might expect. The energy absorbed in the impact gives an idea of the plastic deformation or relative lack of it. If you prefer a more mainstream hardness scale, the tester simply translates the Leeb Hardness value to Rockwell C etc.
If you try to measure the hardness of a coin, the surface features seem to prevent correct operation, presumably due to the small size of the test ball embedded in the relatively large moving head getting fouled in the valleys etc of the surface. Similarly, if the body is small (ie not much more massive than the moving test head) and not supported firmly, the reading suffers (suggests a lower hardness than actual) due to the loss of rebound.
Thought I'd have a go at measuring a few items although unfortunately I don't have any reference pieces of known hardness or other hardness measuring tools to cross reference my measurements.
Let's check these out and see if the readings seem remotely plausible, despite the lack of traceable known references. I'll be interested to see how the pukka Korloy toolholder compares to the Indian (Glanze) equivalent. It's my unfortunate experience that crashing the Glanze toolholder results in the tip of the body going plastic in a non reversible way. In contrast the Korloy grooving toolholder (not this actual example) will fracture if you really crash it properly, rather than bend or flow.
So here we are - ~HRC 35 for the Korloy
And ~HRC22 for the Glanze. Sounds about right - piece of
The body of this ISO40 toolholder is as hard as witches tits. Files bounce off it. It's actually the one that came in The Shiz. Sure enough, we see HRC 52.3
This pullstud adaptor (my design) was made by Funwick in China when I worked there. The test report claimed HRC 56 - 60. They have worked fine but oddly enough(!!), I'm seeing HRC 34.8. That's probably not a bad outcome anyway, as I don't want a component like this to be too brittle.
The "hardened" jaws of the Arc Eurotrade vise suggests about HRC 36, which seems reasonable.
The hardened inner race of this HSK bearing reads around HRC 51. According to Schaeffler, bearings are typically in the range HRC 60-65. Seems to be reading low, given that these are almost certainly through hardened ie shouldn't matter where
Indicated HRC 56 on the table of The Shiz....
I set it to a different scale that is more suited to CI but The Stupid Fat Bloke took this photo and he didn't think to make the display fully readable. The scale indication (HRC, HRB etc) is partially hidden at the top LHS of the photo here.
It's not really suited to measuring carbide but indicated HRC 56 on a 3/4" chamfer mill. It should be more than this but I'm suspecting it doesn't work so well up near the top end of the hardness range.
Conclusion:
Overall, reasonably happy although it's clearly fairly inaccurate. I'd like to be able to get a better calibration using reference samples but that would have to wait until something suitable comes up. In the meantime it looks usable for sanity checking. It'll do for now, being better than what I didn't have before.


No comments:
Post a Comment