Sunday, 31 December 2023

CAD time - couple CBR600RR throttle bodies to my 1967 Honda S800 engine

Having played with the 3D scanner and dismissed this as a sensible means of "designing" stuff, I'm going to focus on CAD solutions for connecting up the throttle bodies and crafting some sort of airbox solution for this setup.

Here's the current arrangement - the throttle bodies (ITBs) are only loosely held in place here on the S800 intake manifold, to illustrate the general concept:


I've previously hacked off the bottom of the original CBR600RR airbox, "leaving for later" the question of how to close it up again. The original airbox fouled the alternator.


The secondary injector bank sits in front of the intake trumpets. They only come on at high engine speeds and throttle settings.


It's ages since I last fiddled with this setup. Back then, my solution to matching the ITBs to the engine were these aluminium adaptors. They are needed because the engine ports are slightly Siamesed in pairs. 


Each pair of ports (1 and 2, 3 and 4) are on 65mm centres. But overall, the ports on the engine are spaced such that the average spacing across the 4 cylinders is 74mm, which is rather handy given that the CBR600RR ITBs have a consistent spacing of.....74mm across all 4 ports. If you do the math, that means each inlet in a Siamesed pair requires a 4.5mm offset.

I went with this hooky solution because it was the best I could do back then. These were made by clamping some thick wall aluminium pipe eccentrically by 2.25mm in the 4 jaw, then machining each end (manually). Ideally, the porting would be flowed to avoid sudden discontinuities. I had imagined that I would do this manually at some later date using a hand held burr.


The inlet ports are somewhat less than free flowing with those steps at the transitions:


Here's what I plan instead. The rubber adaptors are looking a bit perished after 46 years, so it may be rather foolish to design around them. Instead, I will mount my new adaptors direct to the water cooled inlet manifold. This means the mounting surface could see ~100C which is a bit hot for most 3D printed materials. However, the solution may simply be to make a heat insulator plate from Acetal / PEEK or similar. I can deal with that later.


Using the Loft function, I can sort of align the inlet and outlet so they transition more smoothly.


Let's try out the idea in PLA. Obvs I won't be using PLA on a real (hot) engine with gasoline but this should give me an idea if the concept is workable. I'd probably get them made by one of the online providers using something more sensible like glass filled PETG or perhaps some sort of SLA material.


The weak point will be the relatively narrow (thin) neck that mates with the rubber connector at the back of the ITBs. One solution might be to make a short metal insert that fits into the plastic body - but this would require some new materials that I don't currently have and some machining thereof.

Revopoint POP3 3D scanner!!

What up?
I'm sort of preparing myself to get involved with my 1967 Honda S800 coupe again. It's been salted away for the last 30 years (family, kids etc) and deserves to be brought back to life. Rightly or wrongly, I decided to replace the original quad carb setup with a fuel injection system. Nobody knows why - but either way I am some way down the road with it, having hacked the fuel tank about and fitted it with a high pressure fuel pump, so there seems to be no going back.

The main activity remaining is finishing off the airbox, ideally in such a way I can incorporate an air filter. The issue being that the original CBR600RR airbox clashes with the alternator.

Here's the intake side of the engine:


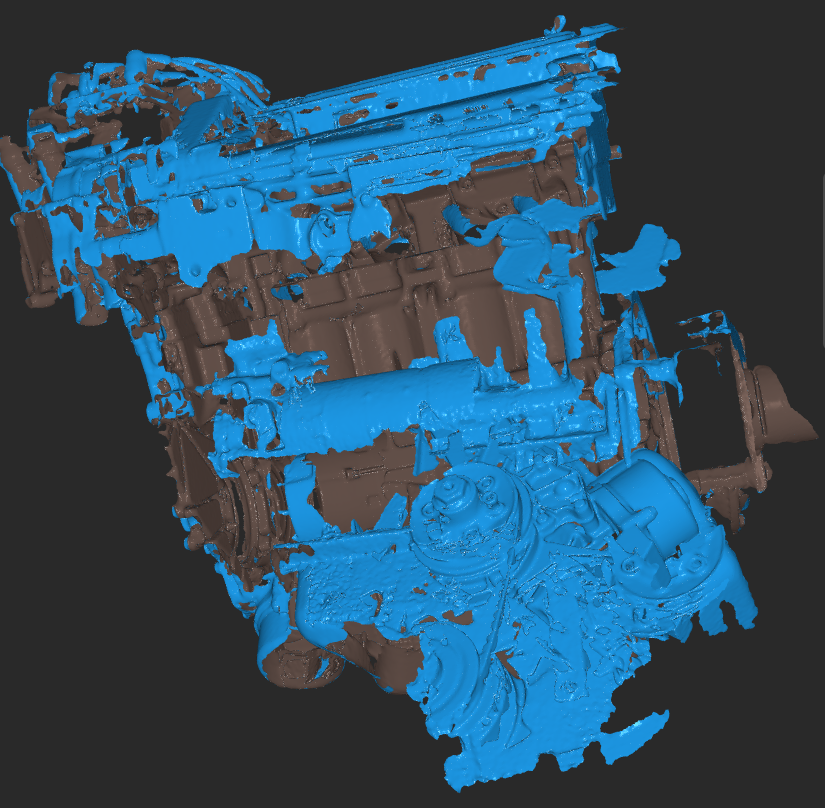
And after a few hours buggering about with the scanner, I've got a sort of result. Ish.


Hmm. Quite a few bits missing here. Here's what the scanning process looks like when you have parts that are small enough to fit on the (Bluetooth controlled) turntable:


The throttle bodies are almost recognisable here, but this is hardly a breathtakingly accurate model. 


I seem to be stuck between 2 extremes: on the one hand, to get decent scanning (ie without losing "tracking" continuity), you need lots of features that the software can recognise and use to stitch together the hundreds of scans, yet wtih too many features, the software is easily overwhelmed. I seem to have fallen foul of the latter. 

Conclusions:
For now, I will conclude that these scanners are good for scanning smallish, organic shapes eg broken handles, hooks, housings etc, thus avoiding having to fully design stuff in CAD. For larger components such as my throttle body assembly, I will be better off sticking to conventional CAD. Must say, I'm somewhat less than surprised at this finding.

Certainly, I'm clearly not going to be able to create a meaningful engine and throttle body model that I can sensibly manipulate within Fusion 360, so for now the scanner will go back in its box while I stick to CAD.

Not vastly surprised or disappointed but it's good to have some clarity as to whet this is good for. And yes, I wouldn't have bought this if it hadn't been for the "season of giving".

Wednesday, 27 December 2023

Cetus3D printer comes out of hibernation

What's the deal, fatty?

Ages ago (about 5 years ago), I acquired a Cetus3D Mk II that I used to print some parts for my Bridgeport conversion, namely a junction box for the DMM Tech servo motors ....


....and a box to house the differential line driver PCBA I made, to enable me to replace the rather ropey cables and rather non-industrial (9 pin D-sub!) in-line connectors that were supplied by DMM Tech with pukka drag cables. 

The original cables included a line driver in a small PCB wedged inside the D-sub connector housing at the controller end of the cable, to complement the line driver that is housed in the back of the servo motor's encoder housing - so replacing the cables required me to source or make a slightly more workmanlike line driver. i couldn't find anything sensible off the shelf, so came up with this one:


This 3D printer came with proprietary software from Tiertime for the slicing and machine control functions (and even an app, although only available in iOS). It worked pretty well, allowing wireless control of the machine and a reasonable user interface. 

For some reason (although nobody knows why), I subsequently bought an "upgrade"(?) kit from another supplier called TinyfabXYZ comprising a replacement CPU board, some actual limit (micro)switches and an LCD display with thumbwheel input. The notion was that this would give me some additional functionality, less reliance on the proprietary software, proper limit switches (although the "stall" method worked fine) and local control of the machine from the (new) front panel. 

To be fair on myself, the Tiertime slicer / control app is very limited in terms of the control you have over the printing settings compared with the likes of Cura, whereas the Tinyfab program runs g code and allows you to generate the code from within an external app such as Fusion 360.

Let's finally get round to installing this Tinyfab stuff and see what it's all about. Here's the standard machine, reassembled:


Cover removed:


And these are the various parts required to fit the microswitches. I printed those before putting the unit into storage 4-5 years ago.


Let's fit the microswitches. Even if I decide the Tinyfab stuff is no improvement on the original system, these can be retained for use with the Cetus controller. I'd prefer a proper switch to the default arrangement which drives the axes into their hard stop and detects the motors stalling - this scheme works well enough but isn't very elegant.

X axis:


Y axis


Z axis:


The switches need a bit of tweaking to make a more dependable contact with the end stops:


That's better:


They plug in to the original headers, replacing the "stall" signals from the stepper driver modules.


Need to move the power and initialisation switches and status LED across to the new cover:


The new LCD display connects up to the replacement CPU board.


Seems to work, once you've put the config file on the correct SD card. There is a SD card slot on the display as well as one on the main PCBA. The update "instructions" such as they are don't tell you which one they mean - it's the main board one, which programs the main CPU, not the one on the display unit, which is intended for loading g code if you don't connect via wifi.


Lid back on:


Does it work?
Well yes, it comes to life once again, this time with a different brain:


Well, that didn't go well. Setting the Z height is a PITA - it really needs a proximity switch but for now that would have to wait. I also struggled to figure out how to set up the G54 coordinates ie where Z0 is, where X0Y0 is etc, with the result that when I tried to run a job, it tried to exceed the axis limits. The documentation is "limited" to say the least, so I'd need to experiment (fuck about) with the machine to figure it out. This isn't what I want to spend my time doing, TBH.

Before getting too carried away with the Tinyfab stuff, let's revert to the Cetus setup and check it still runs properly. Having installed the switches, config and firmware, it's a reasonably quick and easy process to swap between the two setups.

Reverting back to the Cetus. 

This is one of the "primitive" test pieces selected from the main menu, printed twice. Looks pretty good. I used the fast / coarse settings to save time.


Not sure where the part starts and the raft finishes?


A closer look at the slicer, to get a clue:


Aha. Both steps need to be jettisoned:


Pretty good dimensional control in X and Y:


And also Z, once I'd figured out where the true bottom of the part started:


Removing the "raft"(?) was a PITA - perhaps there are some settings that will improve that - but for now, not a bad result.

Conclusion:
  • The Tiertime (Cetus) software is clunky and very limited. Also fucking frustrating, which I recall is one of the reasons I bought the Tinyfab kit. On the upside, they continue to support and update it to some degree, as they are still producing new printer models. Having said that, I'm not seeing any significant improvement in terms of the parameters you can access and control, such as the wall thickness, acceleration etc. And the nozzle preheat / filament loading controls are shit.
  • The Tinyfab kit is also pretty frustrating, although the ability to control settings via Fusion 360 may be its redemption. I may need to look more closely at that.
  • Loading g code to the Tinyfab via the micro SD card is another PITA, as the slot is difficult to access and you can lose the card inside the display housing if you don't stick it into the socket correctly. There is an ESP32 (wifi) unit on the CPU board, so it should be possible to load wirelessly. I forget if I managed to suss that out.
  • Tinyfab don't seem to have followed up since I acquired their kit 4-5 years ago. The support forum is almost nonexistent and the technical documentation is rudimentary to say the least. That's not encouraging.
  • The machine envelope is actually pretty tiny, at 180 x 180 x 180mm. That's fine for small components but for anything else, it's a bit of a toy.
That will do for now....

Arc Captain MIG200!

Yes indeed. Not content with a solitary TIG200PACDC TIG welder , I've gone for the matching pair. ie the MIG200 sister unit. There was ...