NBH2084s boring system - yep, another ebay purchase!
Indeed. The Shiz may be a fine piece of machinery but with perhaps 20-30um of backlash, trying to machine a cylindrical bore by relying purely on CNC movement of a small cutter doesn't end well. The only way to get a truly cylindrical bore is by using a pukka boring head.
So naturally I headed over to AliExpress and got myself a boring head / system from Annway Tools. Their Tooling System catalogue lists an impressive range of tools and they are fundamentally a Taiwanese outfit, so rightly or wrongly I'm expecting their tools to be half reasonable quality. Time will tell.
I went for the NBH2084s system with ISO40 holder to suit The Shiz:

Cost me £201 delivered including all taxes, shipping etc and it arrived within a week. Looks pretty good but obvs I can't actually use it without any actual inserts - TBGT0601#, TPGH0902# and TPGH1103#.
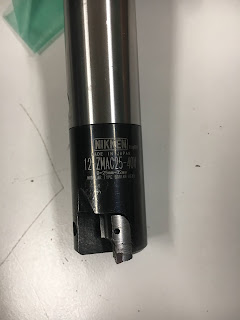
Nikken ZMAC25 - wasn't that enough?
While waiting for the various inserts to arrive from China, I also spotted a Nikken boring bar on UK ebay. I bid the £50 starting price, rather than develop the patience to watch it expire and then make a lower offer. Now it's in my sticky mits.
While waiting for the various inserts to arrive from China, I also spotted a Nikken boring bar on UK ebay. I bid the £50 starting price, rather than develop the patience to watch it expire and then make a lower offer. Now it's in my sticky mits.
It's a fine piece of kit:

It has a 110mm gauge length with BT40 holder and a ZMAC25 modular head. That's good for 25-32mm bores. You never know, I may find other Nikken heads or possibly some Chinese clones if this works out well. It seems to be in reasonable nick.

So yes, I knew it was Bt40 (not ISO40) before I got involved. I've come across this issue before - nice tools only available in BT. Here's my answer - turn up a short adaptor to convert BT to ISO, rather as I did on the Bridgeport. Here's a BT40 that I converted to ISO40 previously:

More chips please!
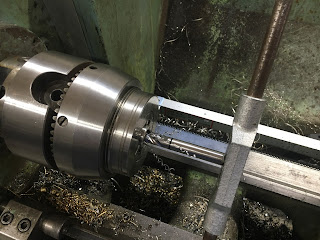
So let's make up a threaded extension. I found some mystery stainless steel in my stock - the only 25mm steel I have. I've got the feeling it may be 316, so this could be tricky to machine. Let's find out...
Centre drilling wasn't nice. It didn't bugger the drill but it didn't want to glide right in there.

Bollocks. If it wants to play hard to get, I've got some carbide drills to retaliate with. Here we go - 10mm through hole:

Followed by 13mm 3-flute:

Now I need an M16 tapping drill. 14.5mm or so would work. I've got a 9/16" that has been well and truly buggered. That's about 14.3mm nominal, so would be rather handy if it weren't so badly nadgered. So, off with the last half inch or so using the angle grinder.

I bit of hand grinding later and Bob's your auntie. Then counterbore to 16.5mm (M16 clearance), chamfer it up and we are done at this end:

Part off at 25mm O/A length. To avoid chatter - and work hardening - you need to give these a reasonable feed. If it starts chattering you may be fucked.

Flip it round, counterbore, chamfer and start the tap off:
It's not a massively quick process but here we are. Now I just need to remove the pullstud and replace it with the extension.

Looks promising

After some crude work with the angle grinder to give me room for a weld, we are done. I'll use an M16 bolt to roughly align the extension with the toolholder and nip it up:

Sticking it together:
Now I need to break out the metal gluing machine (TIG). I haven't used the Miller-Interlas 320BP for a year or so now, not since the last toolholder I converted I suspect....

Ready to go

That went well. Quick skim over on the lathe to ensure it's concentric (on the outside), then it's time to check the runout.
I've identified one of the slots so that I can ensure consistent alignment when I insert it. Bottom line, I can see quite a bit less than 10um - perhaps 5um or so at most. Given that this is a single point boring head, that barely matters but at least it suggests I haven't got a banana on my hands.

While I'm at it, let's also check out the Renishaw MP1s. Also with alignment labelled, I'm less than 5um or so (barely visible on the 10um scale). That's good enough for me, given the basic (in)accuracy of The Shiz.

That's enough for one day.


No comments:
Post a Comment