WTF - why would you need 2 of them?
After many months of watching ebay for a TS27R tool setter, the Renishaw gods finally smiled on me. OK, it's not another probe so much as a tool setter. But the mechanism is the same. And the price. Generally, pricing for these things on ebay starts around the £400-500 mark, so anything under the £300 level might almost be considered reasonable, assuming it's functional.
After many months of watching ebay for a TS27R tool setter, the Renishaw gods finally smiled on me. OK, it's not another probe so much as a tool setter. But the mechanism is the same. And the price. Generally, pricing for these things on ebay starts around the £400-500 mark, so anything under the £300 level might almost be considered reasonable, assuming it's functional.
Last week I spotted one on offer for £400 Buy It Now, which I still considered above my sensible budget. I mean, imagine if The Domestic Manager found out?
I considered making a lowball offer around the £250 mark - after all, in the worst case, the seller might accept my bid. Anyway, after the auction expired without a sale, it relisted at £180 starting price so I put in a bid with a modest margin, to allow for a few small counterbids. Finally the auction ended at £190, still below my max bid, after a half-hearted £185 from some unknown bidder. Anyway, I consider £190 a decent price, as long as it does indeed work as promised in the description.
Sure enough, a few days later it arrived.
What have we got here?
Certainly looks like a TS27R, although the stylus is mounted head on, rather than in the customary vertical position. Will it simply remount at 90 degrees? One step at a time...
Certainly looks like a TS27R, although the stylus is mounted head on, rather than in the customary vertical position. Will it simply remount at 90 degrees? One step at a time...

This is a simple device with normally closed contacts brought out on 2 wires. The installation and user guide shows most of what you'd need to know.
Does it work, Fatty?
Er, no. The red and blue wires are permanently open circuit. So have I been ripped off? Time to take a closer look. Besides, it needs a good cleanup.

The probe nose has a female M4 thread. There's a pair of rubber diaphragm seals, rather like the MP1s touch probe, not surprisingly perhaps.


This slot if for adjusting the angle of the probe in the housing, the ensure the stylus is parallel with the machine table.

Removing the cable gland at the back of the housing reveals the delicate looking wires. Best leave these alone unless absolutely forced to!

Given that there's no electrical continuity across the wires at the other end of the conduit, it seems most likely the wires are damaged between there and here. Certainly hope so, as that would make the repair manageable. There's no obvious damage to the setter itself and the movement of the stylus nose feels good. Fingers crossed.

Sure enough, stripping the wires next to the setter shows that the contacts are NC and they open when the nose is moved. Phew. So I seem to have a functional tool setter. That just leaves me needing to clean it up, rewire it and set it up on the machine.

Being a Renishaw product, it's also fully adjustable angular position (relative to the X & Y axes). To achieve that, there's a pin and a couple of grub screws. This is only required for square stylus tips and accurate machines(!), so of little more than passing interest.

Back together again. Now I need to salvage a section of undamaged conduit and inner cable, splice it into the tool setter and mount the thing on The Shiz.

Cable repair:
The conduit is Thomas and Betts "Anaconda" type ie IP67, very flexible and smooth. There's a lot more of it than I need on The Shiz, so I will be able to select a relatively undamaged section and throw the unneeded / damaged section.
This repair needs to fit inside the conduit, yet be robust and (ideally) waterproof. Luckily I have some adhesive lined heatshrink that fits the bill.

Looks good:

Here's some of the discarded conduit. It's had a tough life.

Done. Cable glands at each end, wires ready to connect up to the Acorn inputs.

Ah - but what about your squinty nose?
Indeed, there's something else to figure out. Like why the stylus was mounted in line with the setter, rather than at 90 degrees. Well it's quite simple - there's a part missing.
Referring to the above illustration from the Renishaw manual and the following piccy, we can see there's a "break stem" component that is supposed to screw into the nose of the setter. The stylus and stylus holder are then fastened to the break stem. If you crash a tool into the stylus, the plan is for the break stem to break, rather than the setter mechanism. These are considered to be semi disposable.
There's also a "capture link" which is intended to keep the broken stylus from getting lost in the swarf tray / chip conveyor. In my application, that isn't going to be an issue, so I can do away with that.

Goody - something else to make?
Looks as if I will need to make one of these up then. What do they look like - and what are they made of?
There's a generic replacement for the TS27R from MSC (for $36!!) that gives a good idea:

There's a similar part from Renishaw (US) for $23. Also said to be silver (and stainless!) steel.
Furthermore, there's even a technical drawing for the TS27R break stem on the Renishaw site, although it has no dimensions(!??). Yes, I wondered what the point was, too. However, it's simple, enough - a 4mm shaft with an M4 thread. A locknut to lock it against the stylus nose and a reduced neck to allow breakage. Put like that, we can simply make one up from a stainless (303) M4 machine screw and a locknut....
Let's make up a break stem:
Here's the cunning plan. M4x55 stainless machine screw, overall length around 20mm. Nice long screw gives me something to hold on to with the lathe chuck.
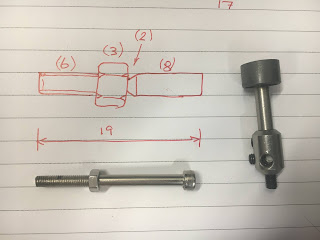
First, cut off the head (so it fits in the lathe) and shorten the threaded portion to ~6mm from the face of the lock nut.
Looking promising:

Now I need to machine the stress groove and then finally shorten the unthreaded shank.

That should work:

For the record, the groove takes the diameter down to ~2mm:

And here it is finally, ready to go on the machine.

Machine installation:
After a bit of minor fettling (hole tapping, positioning, alignment etc), we have a goer.

First set the "reference height" using the MP1s probe, so that the system knows where the top of the setter is. It doesn't actually matter which of the 2 probes trips here, as Swissi's Probe App monitors both probe signals. With the previous Chinesium tool setter, the MP1s always tripped first, being more sensitive (lower trigger force on the stylus).

Then check out the tool setter functions within Swissi's Probe App....

This is tool #9 (6mm chamfer):

Previous offsets were reproduced to within 5-10um, which is the best I'd expect from The Shiz on a good day. Job done.


No comments:
Post a Comment