The biggest drag was setting the WCS origin. If I got a misalignment between the origins of the bottom and top setups, it would show up as wonky chamfers etc when finishing off these operations. So I used the Martest indicator to pick up the end and sides of the workpiece. Cross checking afterwards seemed to suggest I had it within a few 10s of microns, which is good enough for the likes of me.
I couldn't be arsed to video any of it but I stopped the machine a few times to clear away the swarf, blow the coolant clear and take a couple of pics. BTW, the holes in the bottom of the cavity are the remains of the sacrificial fixing holes. As planned, they disappeared during the roughing operation. This is after the (facing and) first step down roughing operation completed:
And part way through the second (final) roughing operation. The pre-machined features from the bottom side operations are now exposed as planned:
After the roughing operation, this is what was left:
This was followed by 2D Profile to remove the remaining radial stock. At 5000rpm and 0.2mm(?) radial stock, there's a fair bit of fine swarf generated:
Next, finish facing the bottom surface:
And chamfer the various openings and screw holes. The tensioner slot and the 2 bores are the acid test of my WCS alignment. If I'd cocked it up, the chamfers would show this clearly. Sod it, let's see what we get:
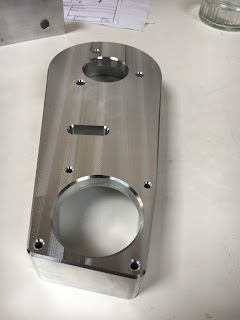
Final result, 26 minutes later is this:
I can safely take it out of the vise, knowing that it will go back in the soft jaws if necessary. But actually it looks pretty damned good:
Must clean the machine now. The swarf is starting to build up....
Retrofitting 1983 Shizuoka AN-SB CNC milling machine, Bridgeport mill, Colchester Bantam lathe and 1982 Tree UP-1000 CNC lathe with modern controls - and other workshop stuff
Subscribe to:
Post Comments (Atom)
Ah, but can Claude do CAM? Let's try some toolpaths in Fusion.....
So, apparently Claude can work within Fusion, using an MCP server (!) that allows it to operate Fusion as if it was a real entity. You give ...

-
Setting up the servo tuning(?) software: Having spent a couple of hours yesterday pratting about with the PID controllers for the X and Z ax...
-
Right, so having gone through the motions with the X axis (cross slide), I should now be able to set up the Z axis (longitudinal) encoder an...
-
The bearing arrived as expected this morning. Took a few minutes to make up a 42 x 25.5 x 7mm thrust washer, then fitted the bearing and was...


No comments:
Post a Comment