Retrofitting 1983 Shizuoka AN-SB CNC milling machine, Bridgeport mill, Colchester Bantam lathe and 1982 Tree UP-1000 CNC lathe with modern controls - and other workshop stuff
Friday, 13 October 2017
Swarf time - vise repair
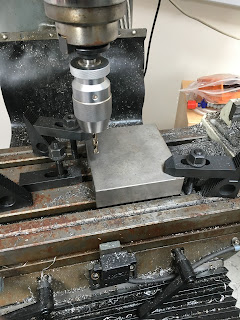
Lump held at 60 degrees, set using electronic protractor thingy. Long series 12mm HSS-Co end mill:
The surface finish is pretty shit but it's non functional and will be out of sight so now's not the time to get all anal about it. Start off the ball socket using the 12mm end mill to give it a head start:
Then use the 16mm HSS-Al ball end mill. This thing from Arc Euro is razor sharp and didn't even think of chattering. Needn't have bothered starting off with the end mill as it turns out.
The ball fits beautifully and spins easily, even without any grease at this stage.
Use the DRO to place and drill the tapping holes for the four M8 fixings. Then use a spiral flute machine tap to cut the threads under power (slow speed range). I've also drilled a through hole under the ball to allow me to push it out if necessary.
Job done:
The ball isn't ground flat yet but this shows the idea:
Now rough out the travelling jaw cavity:
Seems to fit nicely:
So now I've pretty much weakened the travelling jaw beyond any sensible limit. It must be questionable if it is still fit for purpose after this butchering. Time will tell. I'll finish the assembly etc and see if it breaks when I nip it right up.
In the longer term I need to find a decent machine vise for the Shiz so that I can move this Chinese thing over to the Blidgeport.
Drill four 8.5mm holes:
Grind a flat face on one of the balls:
Slap it in, with a bit of grease to hold and lubricate it:
Check the contact between the ball face and the flat face of the travelling nut. Looks good from here. The flat circular indent is pretty much spot on where I'd want it and the top of the nut is obviously clear of the underside of the moving jaw:
Then stick it all together:
The adjuster sticking out of the back of the moving jaw needs to be longer than in the original arrangement, on account of the different position of the mating surface (between the ball and the nut), so rather than using the original pair of grub screws, I have made up a slotted M10 screw with locknut - it does the job.
And rather than further weaken the moving jaw by heavily countersinking the 4 fixing holes, I went for the uglier solution of 4 hex head bolts. I couldn't even find any M10 washers at assembly time. The reason I couldn't find any on the shelf was because some fat bastard had left the M10 nut and bolt collection on the desk. I'll get round to fitting some later.....
Subscribe to:
Post Comments (Atom)
LinuxCNC hell - can Gemini AI help?
Oh no, not AI again? Oh yes. Although ChatGPT got a whole load of exposure and caused a whole load of excitement last year, AI is a bit more...

-
Setting up the servo tuning(?) software: Having spent a couple of hours yesterday pratting about with the PID controllers for the X and Z ax...
-
Right, so having gone through the motions with the X axis (cross slide), I should now be able to set up the Z axis (longitudinal) encoder an...
-
The bearing arrived as expected this morning. Took a few minutes to make up a 42 x 25.5 x 7mm thrust washer, then fitted the bearing and was...


No comments:
Post a Comment