Making the final adjustments and last minute checks in readiness for machining the X axis cover, the power drawbar stopped working. The 4A fuse had gone, so I changed it. The logic for providing a fuse is to prevent fires and danger of shock when a component fails. Unless the fuse is under rated, there is no reason to expect everything to resolve when a new fuse is fitted. Sure enough, although the engagement solenoid came back to life, the impact driver remained inert. Time to look closer....
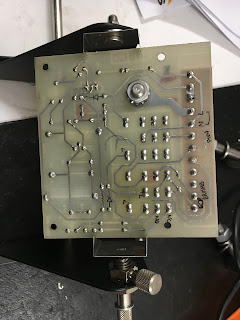
It was a bit of a bugger to get out, as there's a lot going on in there. Lots of photos so that I know how it was connected up and which component goes where:
Note the date codes on the metal can devices - 1983, which is indeed around the time the machine was built.
I started to trace out the circuit but couldn't be arsed to finish it. But I've traced enough to see that it seems there's a delay circuit formed by a couple of the pots and the large electrolytic which triggers the smaller SCR which in turn triggers the larger (stud-type) SCR. This allows a short delay for the solenoid to engage the impact driver before the SCR powers it up and another delay to stop the driver before disengaging it. One of the relays doesn't seem to be used here. The other one controls the direction of rotation of the driver.
On the operating table:
Removed all of the semis apart from a couple of diodes that could be tested in circuit.
- Small SCR (TIC106D, 400V, 5A, TO-220 package) is comprehensively fucked.
- Larger SCR (C230D, 400V, 25A, stud package) is short gate to cathode. Anode is open.
- BF259 transistor (300V, 200mA NPN, TO-39 metal can) is fucked.
- 2N5416 transistor (300V, 1A, PNP, TO-5 metal can) is OK.
- 2 diodes 1N7004 (like 1N4004 ie 400V, 1A) are fucked short circuit.
The nasty blue devil has surely danced a merry little jig in here. The repair plan:
- Ordered a couple of SGS BF259 direct replacement from ebay.
- Ordered a couple of TIC106M (600V, 4A) from ebay.
- Can't get a stud diode direct replacement so will fit a TO-220 equivalent. Ordered a couple of 2N6507G (400V, 25A) from ebay. Will bodge one of these into the space available, possibly with a small loominum heatsink riveted or screwed to it.
- Couldn't find any 1N4004 anywhere and I refuse to drive over and pay 9p each at Maplin, so will fit some BYV26E instead. These are ultrafast recovery diodes rated at 1A, 1000V and although they may not have quite the same peak current rating (I haven't checked), the circuit doesn't look as if it subjects them to anything unduly stressful.
- Also ordered a couple of 2N5416 from ebay They turned up next day although in the end the one fitted seems to have survived.
I've managed to replace everything apart from the SCRs which should hopefully turn up in the next day or so.


No comments:
Post a Comment