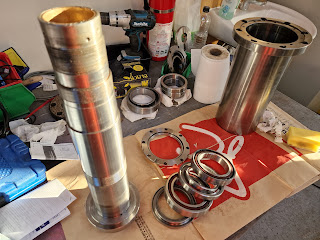
What did you do to the spindle, Fatty?
I've checked and cleaned up the spindle bearing assembly and (thankfully) it all seems to be in order - literally as well as figuratively. The bearings, spacers etc have been marked with a V shaped marking to show the correct sequence and orientation for their placement on the spindle. I can't be certain these were made by the original supplier, whether that was Tree, NSK or some third party.
Interestingly, the fixings in and around the spindle cartridge are all metric which leads me to suspect this was sourced as a finished assembly but we will never know. However, I'll just sanity check the way this has been assembled to see if it makes sense.
There are 3 of the "7017C" angled contact bearings at the front of the spindle and a single "NN3015" parallel roller bearing at the rear (purely for radial containment). Pleasingly, these are described as "super precision" bearings. There's a (little) bit about them in this NSK guide. As mentioned previously, they are pretty expensive, so I'm glad there's no sign of rust or damage. A set of 4 bearings would cost quite a bit more than I paid for the machine in the first place. Bargains aside, spending over £1k on bearings wouldn't sit well with me - or the Domestic Manager if she ever found out.
Interestingly, you can make out the impression of the bearing markings on the face of the mating spacer
These are the first 2 bearings and their spacers. They both point the same way ie take thrust from the tool into the headstock. There's a third 7017C bearing behind them in the same stack that points the other way, to provide the required preload and resist forces away from the headstock.
Reassembling the spindle:
Ready to go back on the spindle...
Here's the front bearing cluster fully assembled. The (keyed) pulley was used as a means of gripping the spindle as I tightened the threaded collar.
Thankfully I seem to have put them on in the correct order.
Now to insert the spindle into the cartridge housing without binding or otherwise buggering anything.
That went well. There's a grub screw to lock the collar. At the rear of the spindle, there's a couple of spacers, one each side of the parallel roller bearing that sits between them (not shown here).
Then fit the locking collar (and its locking grub screw) and the end cover. That's the spindle cartridge reassembled.
Cleaning up the spindle drive compts:
A combination of 180 grit paper and pot scrubber / WD40 does the trick. It's not a bearing surface, so I can be a little more brutal. Comes up nice....
Right, time to refit the cartridge to the machine:
It can be a complete bugger trying to refit a precision ground body into a very close fitting bore. Any slight misalignment and it can bind up. Trying to force it in at this point will only damage stuff. By making markings on the first part of the cartridge, I will be able to see if it's going in - and by how much. Once it's 20m or so inserted, it should then slide into position with little further risk of damage.
The drawbar is a nice close fit in the spindle bore, so it makes a convenient means of wobbling the cartridge about its axis. That way you can feel the "middle position" between binding points, where the cartridge should slide without protest.
There we go. I'm past the tricky bit. Strap off, slide it in and nip up the fixings.
Round at the back, the cleaned up parts have emerged safely.
Drive components:
Now to fit the cleaned up V (drive) and timing belt (encoder) pulleys.
The outer ring actually has a tapered bore and presses a similarly tapered giant olive against the OD of the spindle cartridge. I suppose it prevents any movement of the pulley end of the spindle, as if that were likely, given the close fit of the cartridge in the bore!
Pulleys back on.
Back at the "front" end of the spindle, everything is bolted in place. There is a weep hole in the front compression plate for any oil, grease etc to escape from the front of the bearing. Apart from that there's not much you can get wrong.
I still have the belt jockey pulley to clean up.
Bit of a sod to dismantle but I managed it.
Cleaned, lightly regreased and reassembled. Looking good.
Right, that's the spindle and drive compts finished.


No comments:
Post a Comment