So, next thing is to install the console on its arm, slung above the table roughly where it was on the original installation. Easy enough to bolt it in place with 2 of the fixing bolts, then thread the various cables and conduits through the diecast junction box at the back. Then cut the wires to length, fit crimps and connect up to the terminal blocks.
Now (mid evening), all 3 axes are wired in - encoders and motors. There are also 2 redundant wires on each motor for the tacho signal that are not used on modern digital servo drives - they provide no additional information that can't be derived from the encoder signals. And 2 wires that have some sort of thermal protection function in the motor. Not sure if they are thermistors or bimetallic switches. Ideally the latter but I'll get round to looking at these later.
The limit switches for all 3 axes are wired in, as are the speed range gear status microswitches. The VFD controls and drawbar controls aren't top of the list either, as a rotating spindle or choice of tooling won't be needed for a while.
Bit of a bummer though - the Z axis encoder (the one that I didn't manage to test out) has a problem. When I plug in the encoder cable, the status LEDs go out and the drive becomes invisible on the USB port. I removed the drive and tested it on the bench with a spare encoder and it appears to work fine - which seems to suggest that there's nothing wrong with the drive itself. However, when I plug the Z axis encoder cable in, everything dies. Clearly I will have to rewire the encoder RJ45 tail. Bugger. And just to make matters more difficult, the whole Z axis conduit and its contents have been connected up and Tywrapped in place. I'll just have to undo all that so I can drop the cable onto the table for a bit of fine soldering. As it's all encapsulated in adhesive-lined heatshrink sleeving, I'll just have to cut the end off and start again.
I suppose I could plough on regardless and leave this for later but I may as well fix problems as I come across them. I'd love to connect up a few of the controller lines and start jogging axes etc but that can wait until tomorrow hopefully.
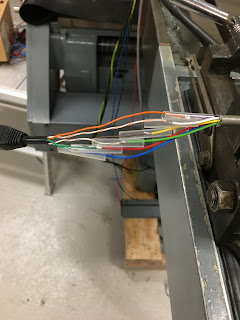
I have a photo of the wiring before it was covered over (below). Hmmm - no mistake with the wire colours there. Possibly a short in the cable? No - tests OK and it's only when I plug in the encoder (or even the spare encoder) that things go wrong. Doesn't matter which encoder I plug in, nor whether it's in contact with the grounded machine.
The encoder at the top of the Z axis motor looks fine and the wiring is the same as the others. The cut-off connector is one of the originals, to compare wiring with.
WTF?? Finally I figure it out. These pics show the problem:
Yes, the cable I used to provide the tail for the Z axis has its colour pairs transposed. There are 4 sets of unshielded twisted pairs (UTP), each either green, blue, brown or orange - one solid colour with a white stripe, the other solid white with a coloured stripe. It's normally a standard way around but naturally the cable I used has its pairs reversed. Bollocks. At least I know the issue and furthermore, nothing seems to have become irreversibly shagged.
Can't be bothered to figure out what ended up connected to what right now (I'll do that tomorrow) but the answer is to reterminate the encoder end of the shielded cable where it goes into the Dsub connector, swapping the wires over as required. Making up a male-female adaptor to do the same job may be simpler, given that the connector is right at the top of the machine.
And yes - the Y axis servo drive that I tried to pop yesterday still works. So it appears to have survived my fists of ham.
Retrofitting 1983 Shizuoka AN-SB CNC milling machine, Bridgeport mill, Colchester Bantam lathe and 1982 Tree UP-1000 CNC lathe with modern controls - and other workshop stuff
Subscribe to:
Post Comments (Atom)
End stop for drawer self closing damper
Que? We have a couple of these pull out spice drawers in the kitchen. They are 150mm / 6" width and are basically filling in a 30cm gap...

-
Setting up the servo tuning(?) software: Having spent a couple of hours yesterday pratting about with the PID controllers for the X and Z ax...
-
Right, so having gone through the motions with the X axis (cross slide), I should now be able to set up the Z axis (longitudinal) encoder an...
-
The bearing arrived as expected this morning. Took a few minutes to make up a 42 x 25.5 x 7mm thrust washer, then fitted the bearing and was...


No comments:
Post a Comment