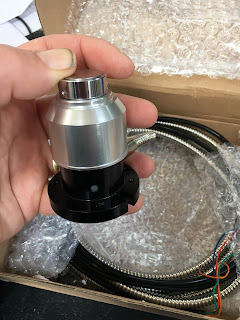
"Unboxing":
Here's what arrived. Not badly packaged and no obvious damage. The instructions have some(!) words of English...
Extensive use of epoxy and / or RTV to seal the base, cable entry etc:
Instructions:
Google Translate tells me that the first switch (red to orange) is a NC switch for the primary probe function and the other switch is an "overtravel" switch. I suppose this could be wired into the limit switch / e-stop circuit as a sort of secondary protection against overtravel. Shan't be bothering with that for the moment.
The spec claims 1um accuracy but that is suspiciously nominal, so I suspect they pulled this figure out of their ass. My machine is probably only capable of 5-10um repeatability, so better than 5 would be OK.
Best thing to do straight away is to strip it down and see what's going on in there. The top plate is a ground steel insert within a brass cap. The description claims this steel is hardened, which is what you'd want / hope to see. Whether or not it is hardened may be another matter. The shroud is made of loominum and is held in place by the brass cap. Once the cap is screwed down, it is locked with 3 tiny grub screws. There is much use of the aforementioned sealant. It actually looks reasonably constructed. Bottom line for me is whether the touch off process is consistent though....
Mounting:
Made a small loominum strap to hold the setter in a fixed position on the table. It is now hard wired so that I can't forget to plug it in before tool setting, given that the tool detection feature doesn't work on this Centroid system (grrr!).
Here it is in action. Actually works pretty consistently. The cable is taken in through a sealed cable gland, although the flexible conduit is almost certainly not waterproof, so I will have to take care to prevent coolant running back up the conduit into the cabinet. To this end, the cable enters from below.
Setting up:
Set up the automatic tool setting parameters so that the fixed coordinates of the tool setter are used when the procedure is called on
- Set parameter #17 to "3"
- Go to Setup > Part > WCS Table > Return and enter the coordinates of the tool setter in one of the "Return" positions. I chose G30 P3, having already set G30 P4 as the approximate position of the machine vise.
That seems to work ok. To automatically set the reference tool (T10 in my case), you do this:
Setup > Tool > Offset Lib > Zref > Auto
The tool then moves above the setter and touches off. Then the Z offset of the reference tool is saved as the reference length.
Note that this probe is NC contacts ie opposite sense to my home made tool. Changed the polarity of the signal from "NC" to "NO" (yes, Centroid's definition is different from mine, as previously noted).
Test results:
I didn't do any statistically significant analysis but after 6 readings I get the impression that it's fairly consistent:
- -98.6925
- -98.6900
- -98.6900
- -98.6900
- -98.6875
- -98.6850
Conclusion:
Early days yet but so far so good. Certainly better than my home made toy and being hard wired, I've got round the bug in the Centroid software.


No comments:
Post a Comment